Your product feed is your backstage production to your wonderful Shopping ads. Once your feed is optimized and ready to go, you’ll need to connect it with your Google Merchant Account so that it can get to work and your campaigns can go live.
Uploading your products via a feed rather than manually one by one will save you a ton of time and energy. It allows you to do things like optimize and make edits in bulk. We’ll guide you through 3 different ways of uploading your feed, depending on what your needs are and what kind of feed you have.
If you’re using a third party feed management solution like DataFeedWatch then you’ll just need to connect your feed once and have peace of mind knowing that it will be updated once you make any changes.
Get your own copy of Google Merchant Center Next: What is it & What’s New?
How to add products to Google Shopping?
Adding products to Google Shopping involves several steps.
- First you need to set up a Google Merchant Center account, which is a free and straightforward process.
- Create your Merchant Center product data feed and optimize it.
- Ensure that your product photos align with Google's image requirements for Google Shopping results. This involves confirming that the main product photo meets specific criteria, such as having a solid background (preferably white or light gray), being appropriately sized, clearly displaying the product from the front without additional elements, and being evenly lit.
- Upload your feed to Google Merchant Center
What is Google Merchant Center data feed?
A Merchant Center product feed is a critical tool for your eCommerce business, as it serves as a file containing comprehensive information about your products and the base for your Shopping ads.
The product feed includes various required attributes, such as title, price, ID, description, link, image link, availability, GTIN (UPC or barcode), MPN, and condition. Ensuring the inclusion of these attributes in your feed is crucial for the approval and visibility of products within Google's platform.
The optimized Google Merchant Center feed is essential for running successful Shopping or Performance Max campaigns and can significantly impact the overall success of your business.
You can upload your product data through Google Merchant Center, businesses, enabling its utilization in Performance Max and Shopping ads.
Add products to Google Merchant Center
The easiest way to add products to Google Merchant Center to advertise is to upload the product feed, which contains information about all your products, to the platform.
The process of uploading your data feed offers three options:
- Upload a Feed to Google Merchant Center using a URL (HTTP)
- Upload a Feed to Google Merchant Center using a file (Local drive)
- Upload a Feed to Google Merchant Center via FTP
Method 1: Upload a Feed to Google Merchant Center using a URL (HTTP)
Who is this method for? This method is perfect for merchants of all shapes and sizes who have created their feed on something like Google Sheets or are using a third party management tool.
Requirements: A URL that contains your feed
Step 1: Create your feed and get a link
Google Sheets
Here's an example of what a feed created in Google Sheets could look like:
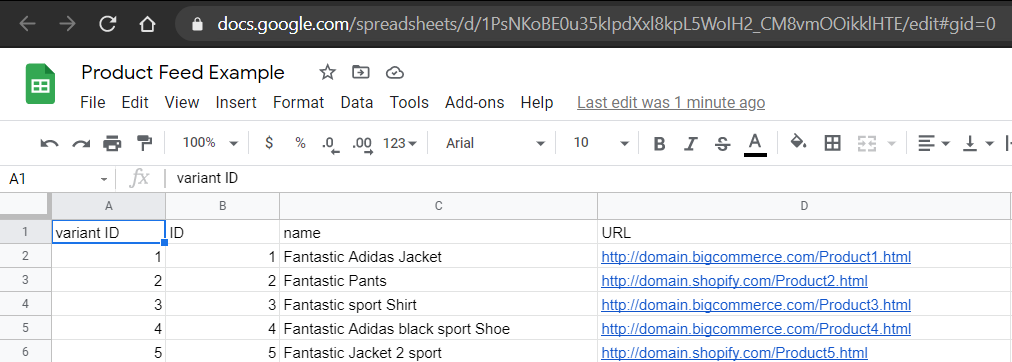
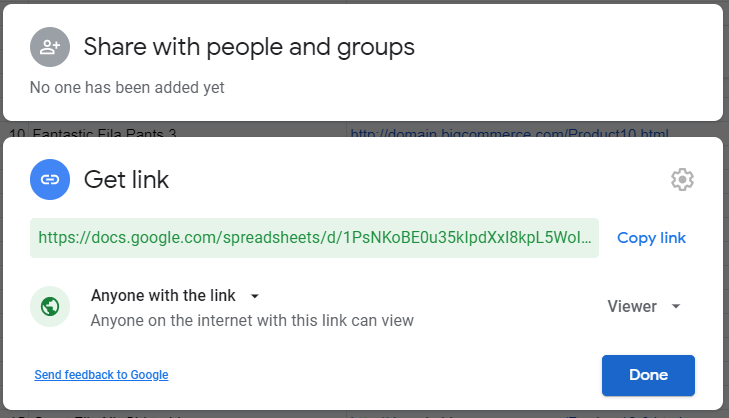
Make sure you change the settings so that it’s able to be read by anyone who has the link.
DataFeedWatch
Once you’ve finished mapping your feed, a feed URL will be auto generated. This is the link you’ll want to copy.

Step 2: Log in to your Google Merchant Account
Step 3: Go ‘Products’ and then ‘Feeds’
Step 4: Add your feed by clicking on the blue plus button

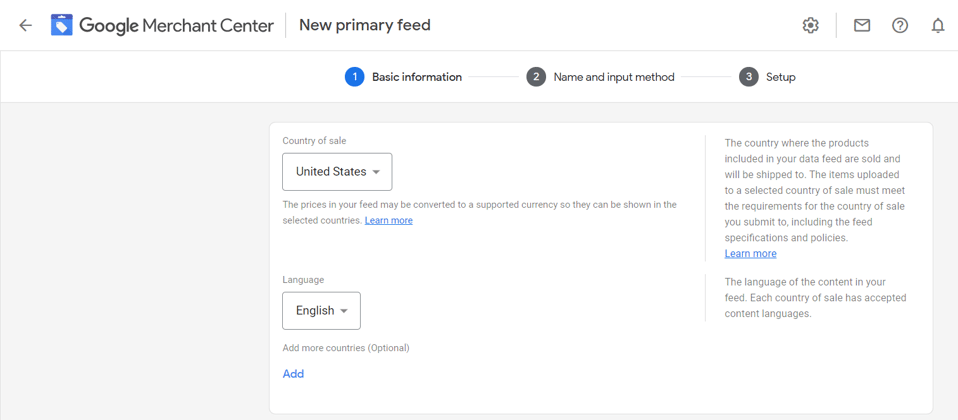
Step 5: Pick the language and country that you’re selling in
After you select the language, the 'Destination' option will appear as well. You can pick which Google Products you want to advertise on like Shopping ads and Free Listings.
Step 6: Give your feed a name
This is just to help distinguish it from other feeds in your account. It doesn't need to match the file name and will only be seen inside your account.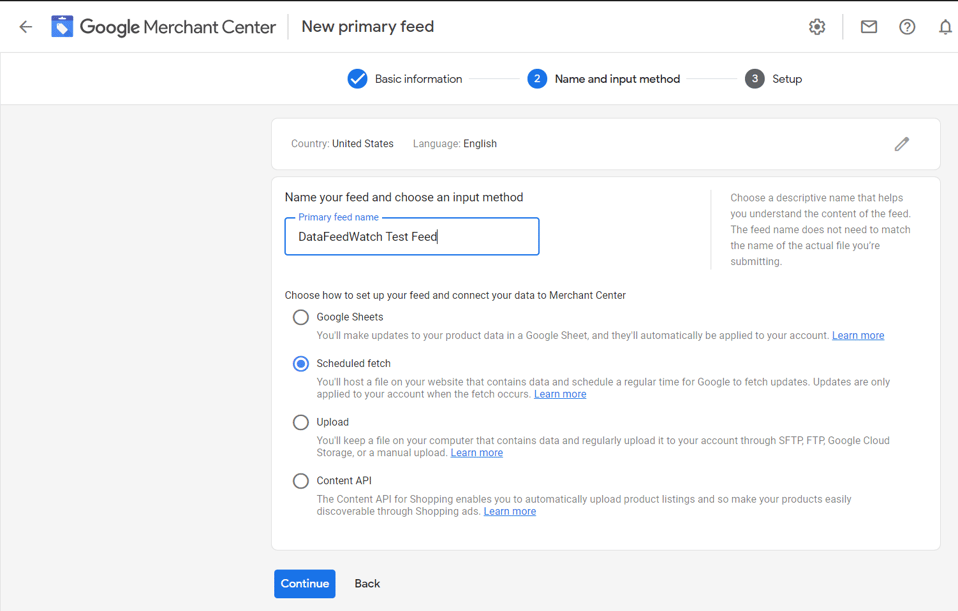
Step 7: Choose the scheduled fetch option. Your feed will be frequently updated from your URL.
Step 8: Click continue
Step 9: Choose a file name and give the file URL
You can name your feed file whatever you like here, but the file URL needs to be copied and pasted exactly.
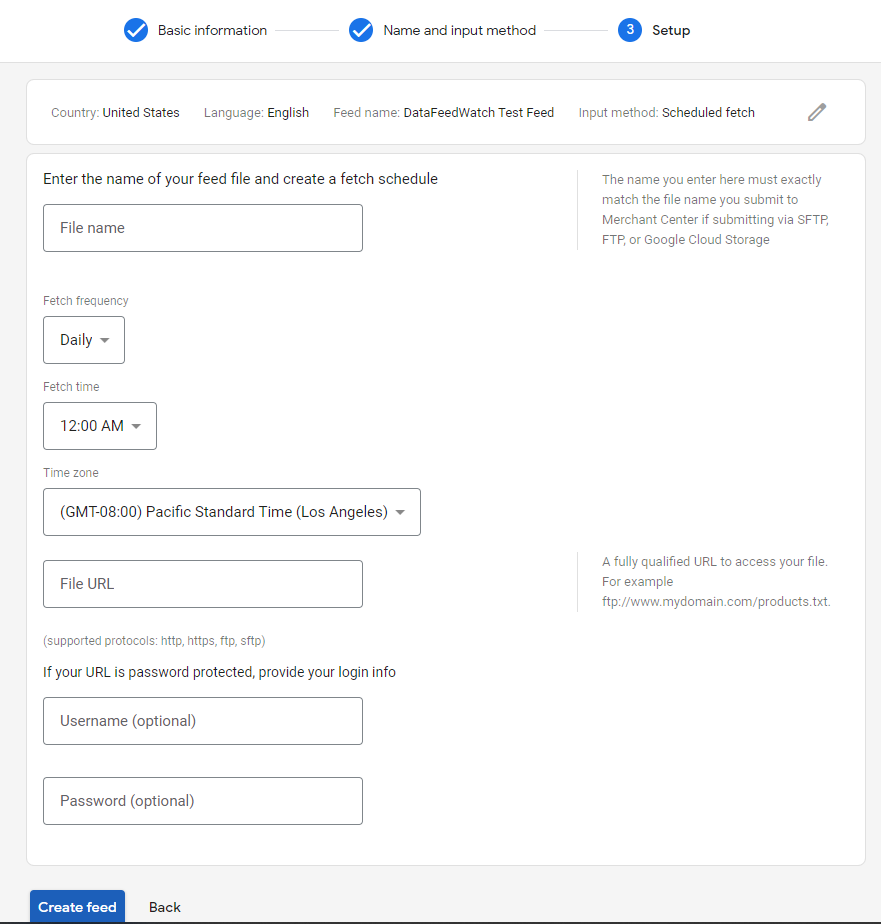
Step 10: Fill in the last details
Decide on your:
- Fetch frequency
- Fetch time
- Time zone
Giving login details is optional unless you've set up a password protected feed.
Step 11: Continue -> fetch now
Your feed will be processed automatically anyway, but if you don't want to wait you can choose the 'Fetch now' option for the first processing.
Method 2: Upload a Feed to Google Merchant Center using a file (Local drive)
Who is this method for? This method is best for merchants with very few products, or for those who rarely need to make adjustments to their feed.
Requirements: A file located on your local drive that is 4GB or smaller
Potential drawbacks: You need to upload a new file any time you make changes to your feed. So it could work for someone who has a few products, but for most merchants it could lead to headaches.
Step 1: Log into your DataFeedWatch account
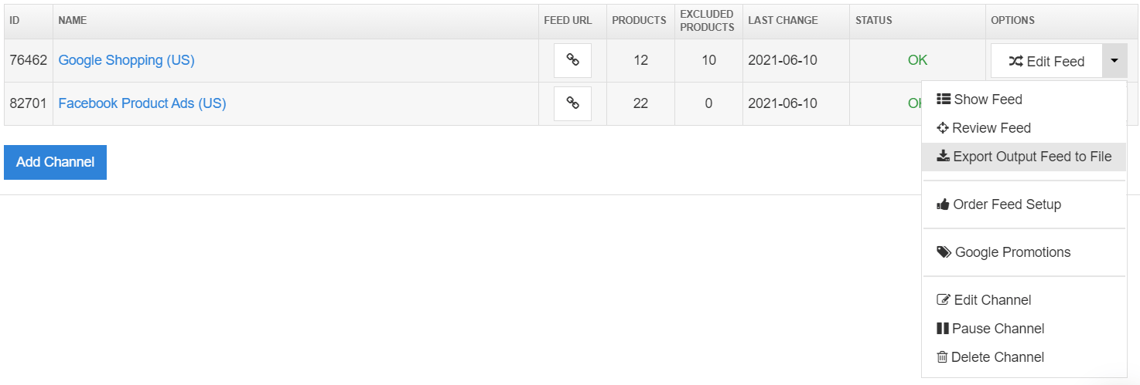
Go to the shop of the feed you want and find your Google Shopping channel. Make sure that your feed is fully mapped and ready to go. Its status should be ‘OK’.
Step 2: Download your file
Under the Options tab click the down arrow and choose ‘Export Output Feed to File’
Step 3: Go to your Google Merchant Center account
Go to the ‘Products’ tab and then to ‘Feeds’. Click on the blue plus button to add a new feed.

Step 4: Enter basic information
Fill in the settings for:
- Your target country
- Language
Step 5: Enter input method
Choose a name for your feed that will help you identify it among your other feeds. It’s just an internal name that doesn’t need to match your file name.
Pick the ‘Upload’ method for how your feed will be connected to Google Merchant Center.
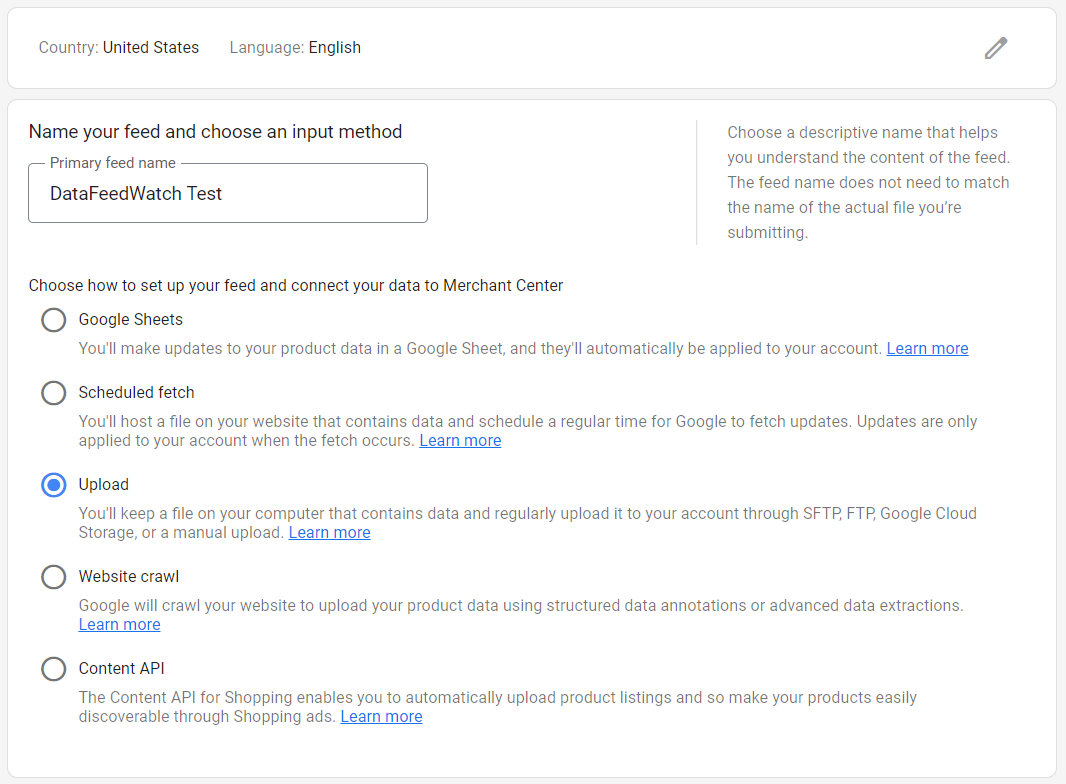
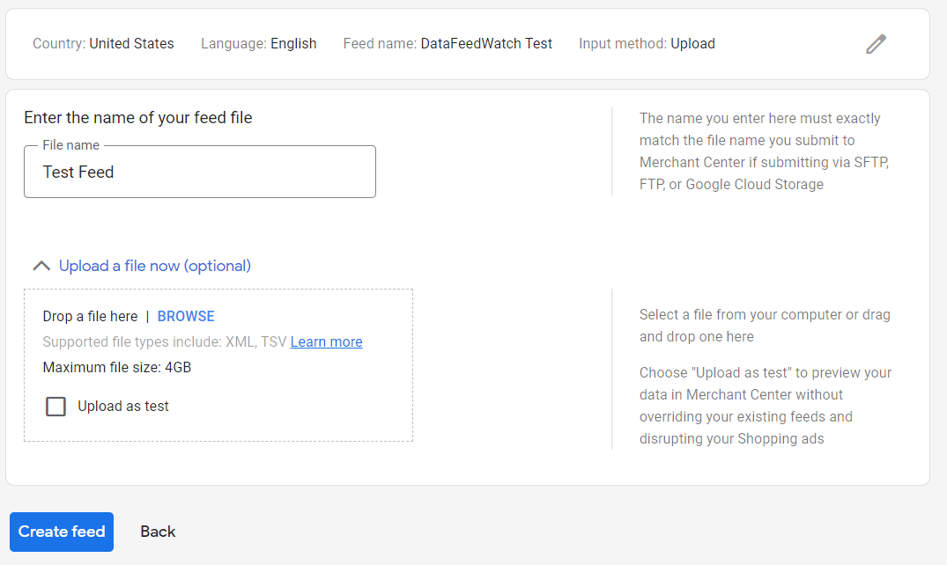
Step 6: Enter your file name
Choose if you want to upload it right away and hit ‘Continue’. And that’s it!
Method 3: Upload a Feed to Google Merchant Center via FTP
Who is this method for? This method is a great match for all merchants, especially those who are interested in making several daily feed updates.
Requirements:
- An FTP client, third party service like DataFeedWatch, or command line knowledge
- An FTP address (for Shopping feeds you’ll use: ftp://uploads.google.com)
- An FTP account - you’ll set yours up in Google Merchant Center
FTP connections are a way for computers to communicate and transfer data. The data in question here is your feed file.
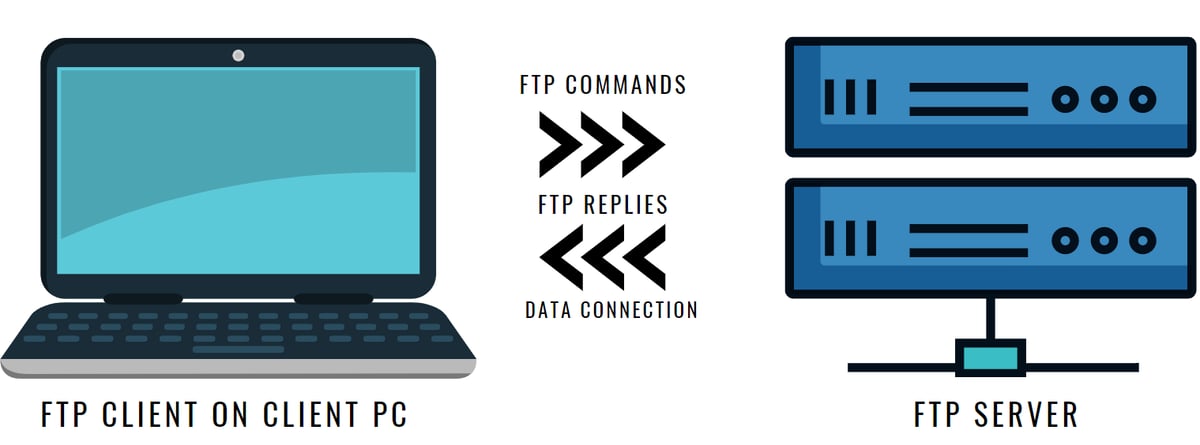 We’ll go through a simplified version here, but if you want more in depth instructions, check out our full FTP article here.
Step 1: Create your FTP account
Google gives you the opportunity to set your FTP account up right in Merchant Center.
Step 2: Upload your file
You can do this in a couple of ways:
- Use a third party client like FileZilla or WinSCP. If you’re using DataFeedWatch, you won’t need to use a client since we’ll act in place of one.
- Use your computer’s command line to connect your file to Google Merchant Center.
Frequently Asked Questions
How can I check my feed for errors?
If you’re using DataFeedWatch then you’ll be able to run a Feed Review after making any changes. It will check for any errors or warnings in your feed and give you an overall health score.
If not, you can check it in Google when you’re uploading your feed. Choose the ‘Upload as a test’ on this screen to test your feed before it goes live.
 Your products will get a status of either:
- Approved
- Disapproved
- Excluded
Either way, you should fix any errors and warnings before your feed goes live in order to keep your Merchant Center account healthy.
How often should I update my feed?
Google requires you to update your feed at least once a month, but we recommend you do it much more frequently. Once a day works well for a lot of merchants, but if you have a feed that’s changing many times a day, then multiple daily feed updates is the best path for you.


