When you consider that 2.01 billion people sign into their Facebook accounts every day, it stands to reason that Facebook is a valuable place for e-retailers.
Advertising on Facebook can be both affordable and effective, if done correctly. What we don’t want is for you to throw money at Facebook and pray it works. If you want to drive people to your page or website through Facebook advertising, you have to do it correctly or not at all.
In this post we take a look at how to make sure your pixel is installed properly and how to let Facebook optimize your campaigns with their data.
Facebook Optimized Bidding
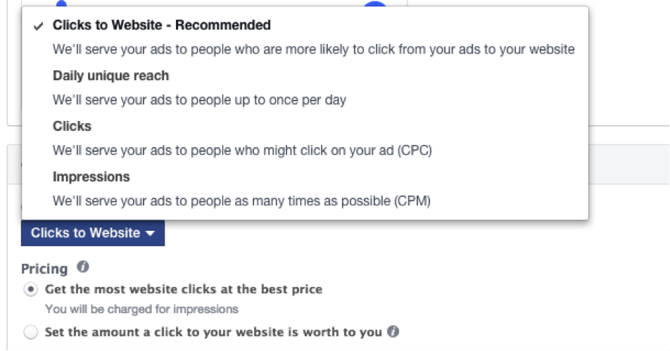
Optimized CPM allows Facebook to places bids andtarget audiencesthat it thinkswill most likely purchase your products. We’ve seen It improve click-through rate, increases conversion rates and decreases cost per click.
This is a great option if you are still trying to figure out where your bids should be for each audience. Most of the time you want to target a specific small audience, set your bids and see which one performs best so you can use that strategy for future ad sets.
With optimized CPM you can start with a large audience and let Facebook do the work for you. Optimized CPM works wonders when paired with conversion spec. You can choose an action (clicks) and Facebook will choose buyers within that group based on what is working.

To set yourself up for a successful campaign, you must first supply Facebook with as much relevant data for each ad set as possible.
For the optimized CPM to be effective you will need about 15-25 conversions a week, but a more ideal number would be about 50-100 conversions per week to really see an impact. Facebook needs lots of conversion because it learns from the statistically-significant number of conversions data you supply.
Facebook tracks your conversions within a certain time frame that you choose, and example of this is a 7-day conversion window. You will want tobid based on the window you choose, even if you’re interested in conversions that happen outside of a certain timeframe you will still want to bid based on that time frame.
Tip:When you run your reports keep in mind that you might see more then 15-25 conversions but if it didn’t happen in the window that you specified it won’t help Facebook optimize your ads for more conversions.
When it comes to conversion optimizationquality is more important than quantity.Look-a-like audiences based on your best customers is usually the best tool for targeting, and optimizing for conversions.
Also, you will want to expand on the best customer source instead of creating multiple similar audiences. Try expanding from say top 1% to top 2-3%. You will also want to stay away from traditional targeting such as gender, interests, and age.
By adding this you’re probably doing more harm than good, it’s better to let Facebooks system choose.
As a backup make sure you check the "Expand interests when it may increase conversions at a lower cost per conversion" box when you are first creating your ad sets.
It allows Facebook to expand its targeting if there aren’t enough conversions from the specifically-defined target audience. It works a “switch” to expand your audience in case the current audience isn’t performing.
You always want to start with optimized bidding as a rule of thumb, whether it’s oCPC or oCPM. When running remarketing ads its best to use the basic oCPM strategy because the audience has already been pre-qualified because they have already visited the site.
Related: Use Facebook Custom Labels to Optimize Bidding
Install the Facebook Pixel Correctly
We know this sounds obvious, but you want make sure your Facebook pixel is set up correctly, because complications can arise. The pixel needs to be installed to track all the necessary data of your campaigns, which is why is so important it is done correctly.
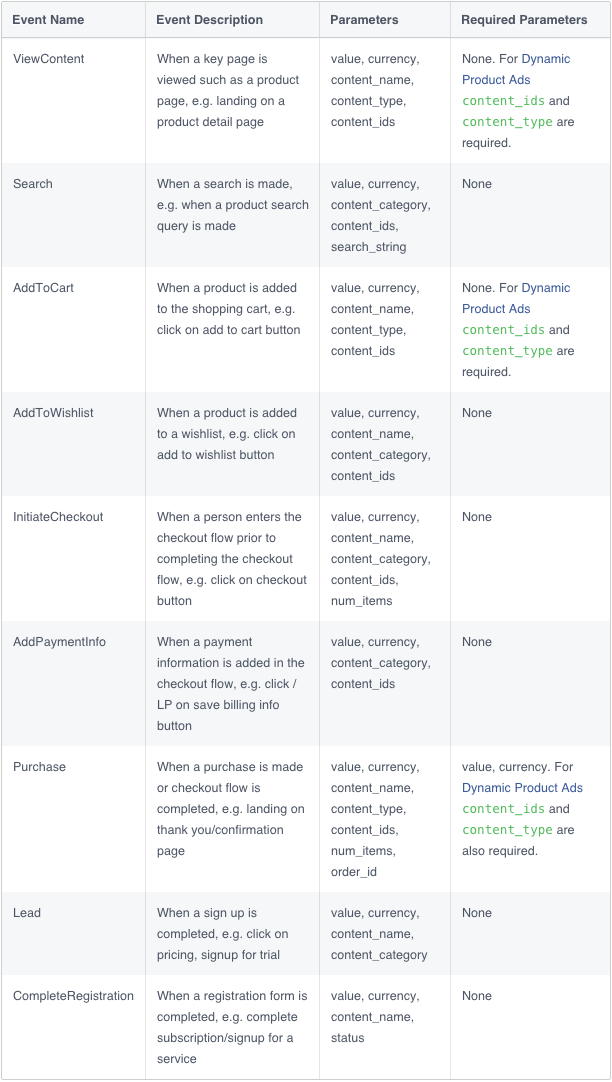
You will need to place the pixel on your website and modify it to report when product IDs from your catalog are being viewed, added to cart, and purchased. The pixel is used to create website Custom Audiences or to track conversions through the Facebook Interface.
You can find the pixel under Tools > Pixels, there you will be able to copy the code and paste it on your website, app event or app.
![]()
After you place the code on your site you will be able to create conversions for actions that you would like to track on your site.
Types of actions you might want to track with the Facebook Pixel:
- Products added to the wish list
- Products added to the Cart
- Products purchased
- Cart abandonment
- Product Page viewed
- Offline purchases
![]()
To track that the pixel is working correctly you will need to download the Pixel Helper. The Pixel Helper works in the background and if your website has the Facebook Pixel installed correctly the </> icon in your browser will appear blue and next to a badge showing the number of pixels it located on the page.
![]()
The New Facebook Pixel
As of February, 15th 2017 you are no longer able to create ads using the old conversion tracking pixel, Facebook switching to their “Facebook Pixel”.
![]()
Moving over to the new pixel is a three-step process:
- Install the pixel event and base code from Facebook
- Transition your ads from the old pixel to the new pixel
- Remove the conversion pixel code after completing the transition
The base code and event code interact differently on your site, and report different actions back to Google.
The base code tracks the activity on your site, providing a baseline for measuring certain events. The base code needs to be put on every page of your site.
The event code acts differently by tracking events that occur on your website as a result of organic reach (unpaid) or organic reach (unpaid) and then let you leverage those for your advertising.
Before this new pixel, you would have a unique conversion pixel id for each conversion. With this new pixel, you only need one id for your account, and you can track the action now by the different event (ex. Purchase).

After it’s been installed you will want to check a few areas to make sure it’s been setup correctly:
- You want to make sure you are still getting around the same traffic as you were before, you can check this by looking at your Facebook Pixel Dashboard.
- You should check the conversion volume between the old pixel and the new one, both will provide the conversion activity for the last 7 days.
- You will also want to check the different types of conversions compared from the old pixel to the new one. You can do this by looking under the events tab in the new pixel then compare it to the conversion tracking pixel page of the old pixel.
Once you have checked that everything looks good and you tracking everything correctly, moved over your ads and ads sets to the new Pixel, now it’s time to remove the old pixel from your site. Just make sure before you remove it, it’s not being used for optimizations or tracking of your active campaigns.
Navigating your way around as an advertiser and trying to figure out the best way to present your ads the most visited social media platform can be daunting.
If you know how to optimize your Facebook ads properly, you can increase your profits considerably.