When using Magento as an eCommerce platform, the logical next step for many merchants is to start advertising on Google Shopping. The best part about this is that all your product information and data is already there.
You can use Magento to create a powerful and well-performing Google Shopping feed. But you may run into some roadblocks along the way when it comes to accurately matching feed attribute names between the two. Fear not. We’ll go through each of the attributes that differ, both required and optional.
Importance of feed optimization
Fully optimized product data feeds are integral to the success of a Shopping campaign. Google has a specific way of processing the information in your feeds, so it needs to speak Google’s “language”.
As an incentive to put the hard work in, you should see the results in increased performance like ROI and conversions. But incorrect or improperly mapped feeds can and will hurt your performance.
Since all merchants presumably have the bare minimum/required attributes, you need to go above and beyond to outperform them.
Magento fields vs. Google Shopping feed attributes
In a perfect eCommerce world, every advertising site and software would use the exact same names to define each attribute. Unfortunately, this isn’t always the case. If you use a third party app like DataFeedWatch, then the heavy lifting is done for you with pre-defined templates for shopping channels. But either way, you’re going to have to be familiar with the differences to know what you’re looking for.
For example, one site may refer to a discount as “sale_price” and another one as “special_price” (spoiler alert: you’ll see this exact example under ‘optional feeds’). They both are referencing the same thing, but won’t be able to recognize the other.
If you’re getting your product data feed from Magento to create a Google Shopping campaign then you’ll need to do something called “mapping” your feed. This is where you make sure you have all the required attributes (with the correct information) and add any optional attributes you want to include. The ‘rename’ rule is the star of the show when you already have the information needed in your feed.
There are two main components to this rule. The blue box on the left represents the attributes required by Google, and the drop-down menu on the right is your exported product data from Magento to match the Google attribute. But for the purpose of this article, we’ll list the Magento attribute first and then show what it should be for your Shopping feed.
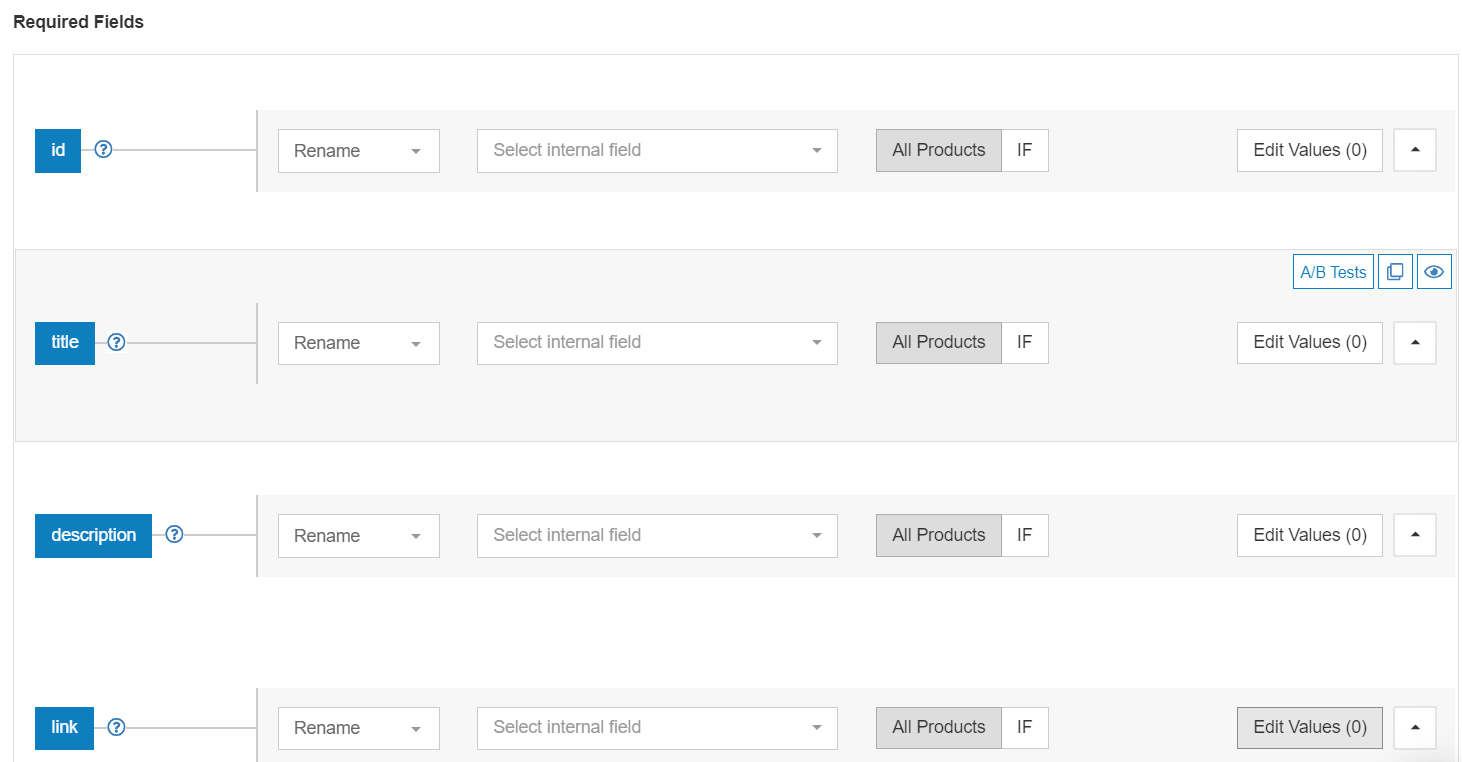
Required attributes
These are the fields that you must have for your Google Shopping product feed. If you’re using the DataFeedWatch app, they will all be clearly displayed in a pre-made feed template so you’ll be sure not to miss anything.
SKU or product_id → ID
Product IDs are unique identifiers given to each item you sell.
SKU
The only unique identifier that Magento requires is the SKU field. This can be a code that you’ve made yourself to identify your products.
A lot of merchants and advertisers have their own system for determining SKUs that allows them to identify products easily. Let’s say that you have given all your apparel items a SKU that begins with the letters ‘AP’ and all electronic items can be distinguished with ‘EL’ at the beginning of the SKU.
In order to map this field, you can simply use the ‘rename’ rule.

Product_id
You might also have an attribute called ‘product_id’ in your Magento feed for some, if not all, of your products. If this is the case, then you can use it to populate the Google’s 'id' attribute and then default to SKU when it’s not available.

Important note: Google uses your product IDs to keep track of its transaction history and ad quality score. If you change this ID then all the product's history will disappear with it. So while other attributes can be optimized and changed regularly, you should choose this one wisely.
Name → Title
This is the product name that people will see when your ads appear. You can simply rename the Magento field ‘name’ for the Google Shopping field ‘title’. But, a better option here could be to combine the field ‘name’ with other relevant information in order to optimize your titles.
The field ‘title’ has a character limit of 150, but in most cases, only 70 will be displayed. Build your title with the visual attraction part in the first 70 characters and leave for last the elements that have the lowest impact.

Combining attributes
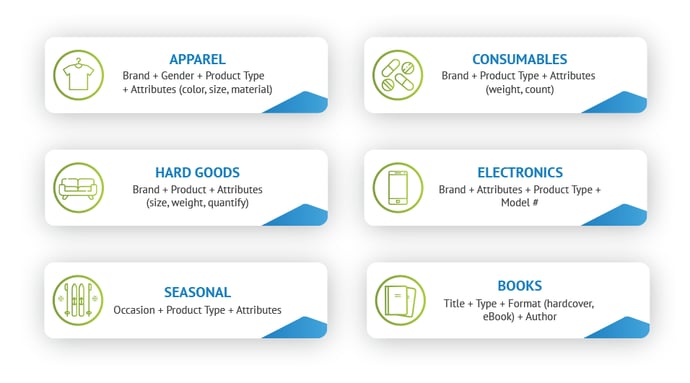
Shopping Campaigns don’t allow for targeted keywords, so you’ll want to include as many relevant ones in your titles as possible. You can do this by using the ‘combine’ rule to pull data from your feed to create a product title.

Make sure to include the most important data at the front. Include the brand, name of the product, and all other specific details. There are Google best practices for you to follow, depending on what you sell.
Description or short_description → Description
There are actually two options when it comes to setting your description. The first is the ‘description’. But you might also have a field called ‘short_description’ in your Magento feed.
Description
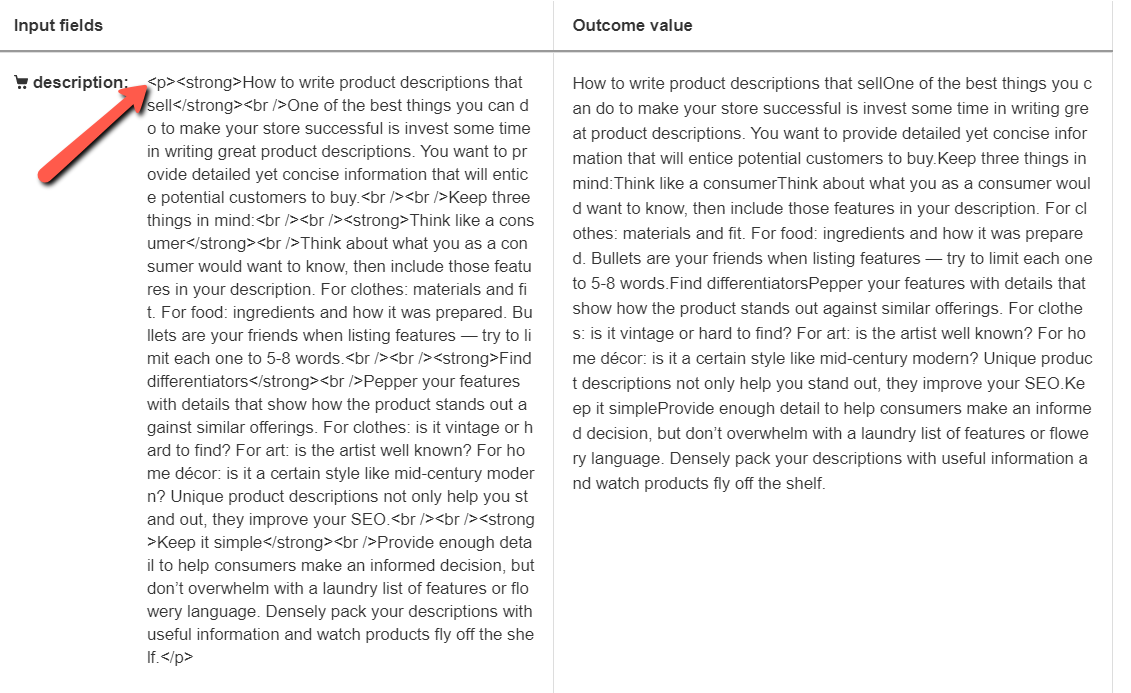
The description field can include light html (think paragraphs and bold text). Oftentimes, you’ll have HTML tags in your Magento description that will look messy when sent to Google. Fortunately, if you’re using DataFeedWatch then you don’t need to worry about it since we automatically strip the HTML tags before sending it over to Google.
You can see a before and after example below:
Short description
Short_descriptions are sometimes used in RSS feeds.
RSS feeds allow computers to get updates about websites in a way that’s standard and readable for them. You might have used (or use) this to keep up with current news online.
For your description field, Google advises you to stay between 500 and 1,000 characters so you will need to meet editorial guidelines.
Meta_description
It’s not always the case, but you might have meta descriptions in your Magento feed. This is an optional attribute, but If you have it, it might be better to use. To know for sure, check the data that’s included in your meta_description. If it includes all of the relevant information and is within the limit then you can use it instead.
The rule of thumb is that using the most relevant information is best, so take that into consideration when choosing.
And what happens if you only have meta descriptions for some of your products and you want to use it when available? You can create one rule in DataFeedWatch that does exactly this for all of your products.
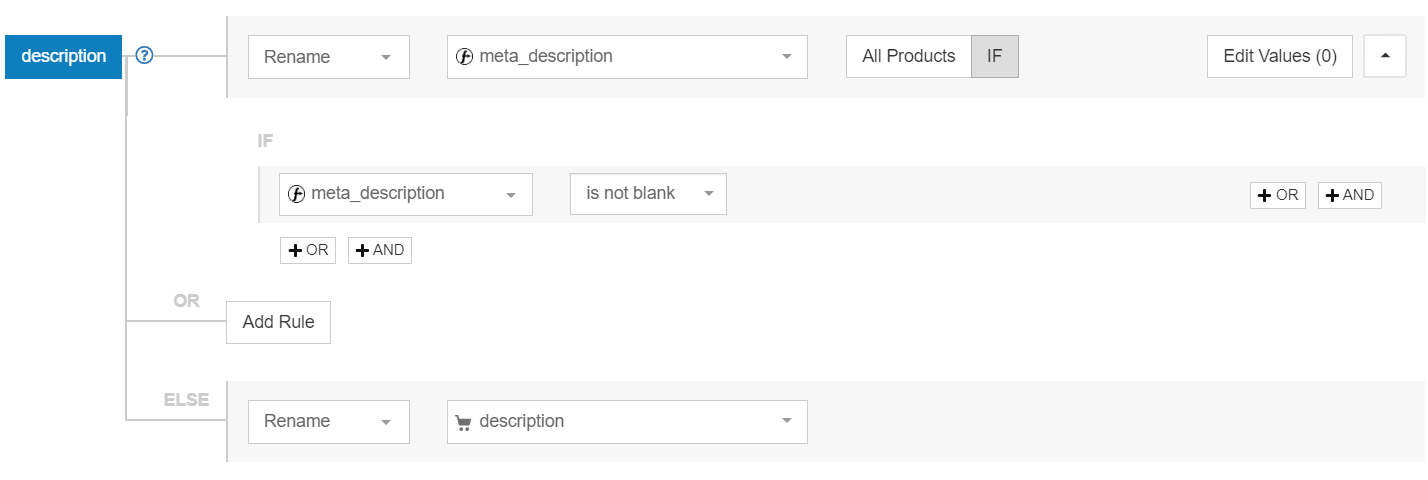 For 'Else' you can rename with the attribute you've chosen instead (like short_description).
Product_url → Link
This one is pretty straightforward if you don’t have any product variants. Simply renaming this attribute from ‘product_url’ will do the trick.

Product variants
Google is very particular when it comes to showing people accurate information in your ads.
This is especially important if your variants differ in price. Having the same link for products with variants of different prices may lead to item disapprovals or ever account suspension. So to avoid getting into trouble you’ll need to make sure that your variant products each have a unique URL.
If you're using Magento 2 then you might be using an attribute called 'url_key' instead. If this is the case then you'll want to map your rule like this:

Use the 'Combine' rule to type in your shop's URL, choose your url_key attribute and add a '.html' at the end and you'll be all set.
Image_url → Image_link
Another quick and easy one. Use the rename rule here like with the attributes.
The image is what sells the product, so make sure your Magento main image meets requirements. At least one image per product is required and it has to be provided in the ‘image_link’ field.
Variant images
It’s not uncommon for merchants to forget about using the variant images they have and instead just using the default image. But it’s a best practice to use your variant images whenever you have them, especially when it's a product that comes in many different colors or other variations.
Google's Image Requirements
Another best practice is making sure to use the biggest version of the image you have. To get your images approved, you’ll need to follow the size requirements Google provides. Some of these requirements depend on what kind of product you’re selling.
For example, images of apparel need to be at least 250x250 pixels, and non-apparel items should be at least 100x100 px. A general rule is that any image can’t be larger than 64 megapixels and the file size can’t be larger than 16 MB.
Price
If you're not having any sales on your items, then a simple 1 for 1 can be used here. You can just remap your Magento price field with Google's price field like this:

But, if you know you will have sales (now or at some point) then you'll need to set up your rule a little differently to account for them. You can do this in one of two ways.
The first method: Tell Google that you want to use the special_price (sale price for Google) when available, but then default to the regular price when it's not. That rule will look like this:
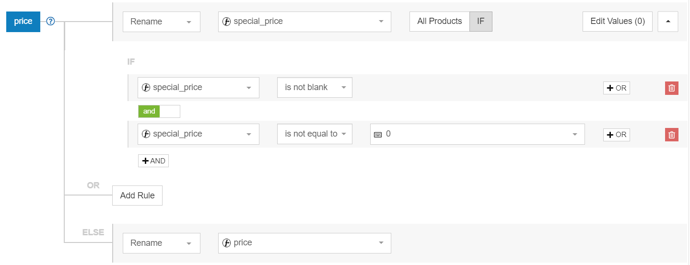
The second method: Renaming 'Price' with 'Price' like in the first screenshot. But then adding the 'sale_price' attribute to your feed (more on this in the optional attributes section) would be mandatory. We recommend this second option because then your ads will be eligible to show strike-through pricing which is good for catching the attention of shoppers.
Manufacturer → Brand
Sometimes this attribute will be downloaded as ‘Brand’, but it might also be ‘Manufacturer’. If it’s the latter, then use the ‘rename’ tool to map it correctly.
Is_in_stock or quantity → Availability
Which attribute you have in your Magento feed will determine how you map it for your Google Shopping campaign.
Is_in_stock
There is a 1 or a 0 in this field meaning that '1' confirms the product in question is in stock and '0' means it's out of stock. However, Google requires that you rename the field to ‘Availability’ and that the values are ‘in stock’ or out of stock’.
Let's see how you would map this out correctly. First. rename 'availability' to 'is_in_stock'. It will look like this:
 Do you see that there are 2 edited values? This is where you'll overwrite the '1' and '2' values to match Google's requirements. Click on 'edit values' and set it up like this:
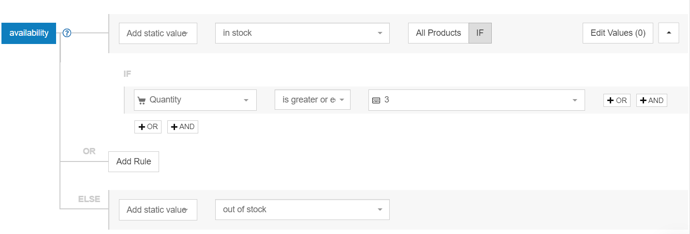 Now when your Magento feed attribute 'is_in_stock' has a value of '1' it will be read as 'in stock' by Google, and 'out of stock' if there is a '0'.
Quantity
Instead, you may have the number of products currently available shown. If that's true then you'll map a rule that tells Google when to stop showing your product.
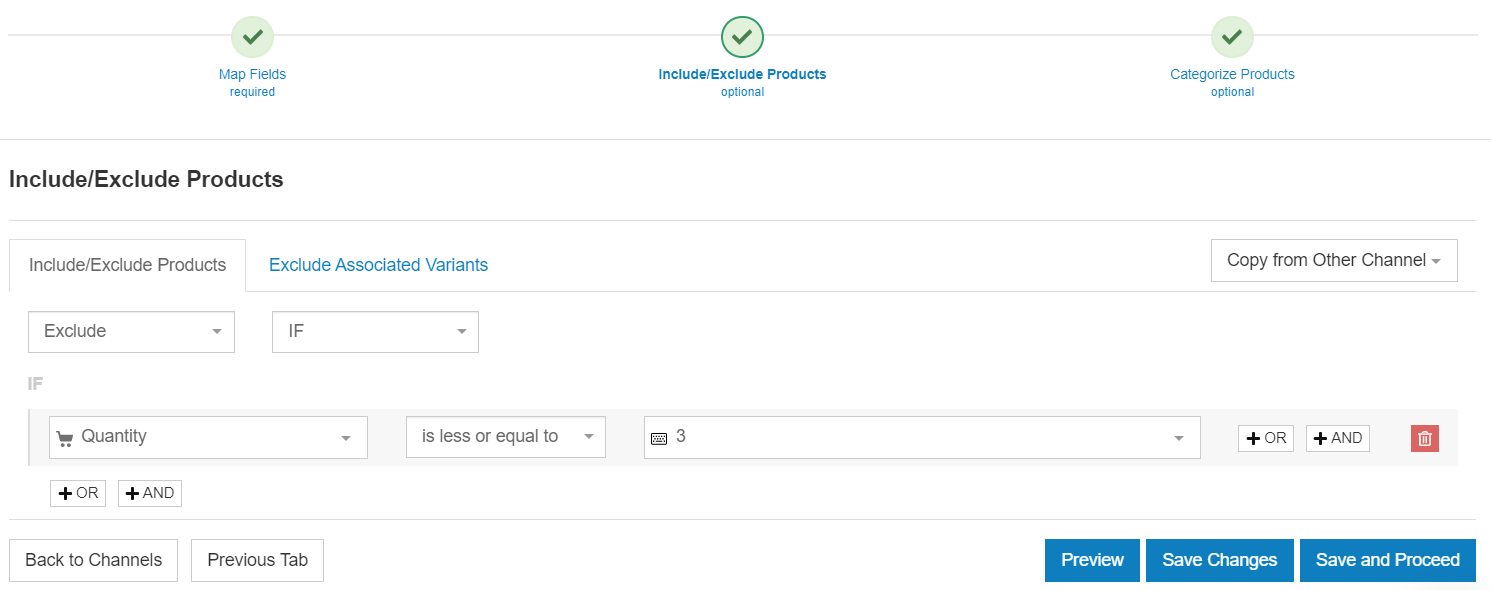
For example, maybe you want your products to stop showing once your inventory reaches the last 3 of that product.
This is how you make that happen. First, rename 'availability' to 'quantity'.

Then, save your changes and head to the 'Include/exclude' tab of the mapping page. Of course, choose the number of products you're comfortable. We'll use the example of 3 products here.
Optional attributes
These fields are optional in the sense that they’re not always required by Google. However, to run a successful campaign, you should include these when possible to enhance your campaigns.
Special_price → Sale_price
These attributes can be used for products on sale. When a sale is active, the sale price will be shown as the current price in Google Shopping search results.
Sale price can be renamed from the Magento field special_price to the Google Shopping field sale_price.

Sale_price_effective_date
Sale price effective date allows you to accurately define when your product goes on sale while also communicating to Google the exact duration of the day and time that it’s happening.
The format is to have the start and end dates separated by a forward slash (/): YYYY-MM-DDTHH:MM-TZ/ YYYY-MM-DDTHH:MM-TZ where TZ is a time zone.
For example: 2021-03-01T13:00-0800/2021-03-11T15:30-0800.
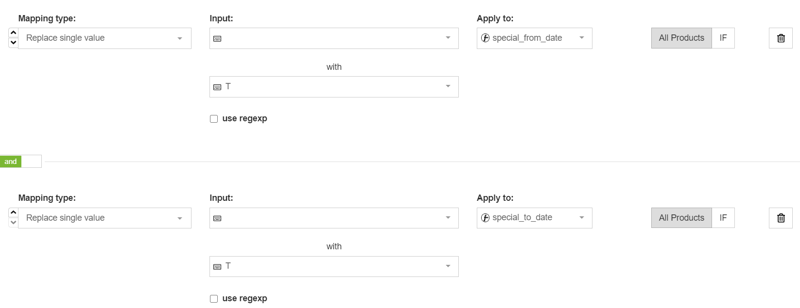
Sale price effective date can be created by combining two Magento fields – special_from_date and special_to_date. Due to format differences some additional rules need to be applied.
For example if you would like to set a sale price time between 10:00 and 16:00 of UTC-8 Time Zone the required set of rule would look like this:

Then go into 'Edit Values' to replace the time with when you want the sales to start and end.
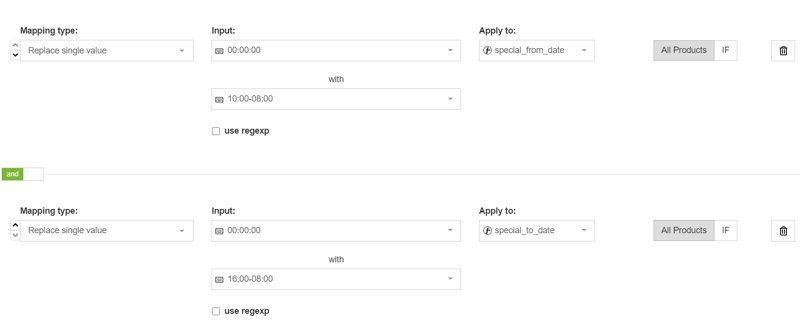
Create a another 'Replace' rule and add one space into each 'Input' bar and replace it with a 'T'.
GTINs
GTINs (Global trade item number) used to be required for products on Google Shopping. Now they are optional, but you should provide them for your products anyway. This is because Google gives priority on the SERP to items that have them.
You might find yourself in 1 of 2 situations:
1. You already have GTINs in your Magento feed
Great! You'll just need to map them correctly so that Google knows what to look for through what's called a 'look-up table'. Here's how to do it:
If you don't have them for all of your products then add an 'Or' segment to the end of your rule telling Google to leave it blank for products without.
2. There are no GTINs to be found
All is not lost. You can still apply to get GTINs for your products. Check out our article on how to find GTINs for your products to get started.
If you have GTINs but just not in your Magento feed, then you can add them in using a 'look-up' table.
 You'll just need to have a separate document (Google spreadsheets or csv. files work perfectly that contains two columns. The first column should be a unique identifier that all your products have. This could be your SKUs or MPN for example.
In the second column you'll put the corresponding, unique GTIN for each product.
Google_product_category
This attribute is automatically assigned by Google, but you can override what’s chosen to make sure there aren't errors.
To optimize your results it is really worth taking the effort to match your product types to the most specific product-category available in Google’s taxonomy using the deepest sub-sub-category level from your Magento store.
Weight → Shipping_weight
This attribute is especially useful if the shipping cost of your products depends on the weight. In that case you will need to create a weight-based shipping rates table in your Google Merchant Center Account.
Shipping weight will be used to calculate the shipping cost of the item automatically.
You can rename shipping weight from Magento field – weight. A small issue that remains to be solved, is that Google requires a weight unit (10 kg) while the weight attribute in Magento Shops is solely numeric (10).
To fix this, you will need to append a weight unit at the end of each value. If you are using data feed software like ours it can be easily done by clicking Edit Value and choosing “add suffix” from the actions dropdown:
Note: There needs to be a space before the unit so that it looks like this “ kg” and not “kg”.
Shipping costs
Google Shopping will automatically calculate the shipping costs if they vary based on the weight of the products. Just add the '' shipping weight'' field and specify shipping rates in your Google Merchant Center account.
Even better, if you offer free shipping don't be shy, you can set this up as a Google callout extension (not in your ad copy) so that it shows at the bottom of your ad. Just don't forget, if you're using free shipping then you should use the value '0.00 + the currency' rather than just 'free shipping'.
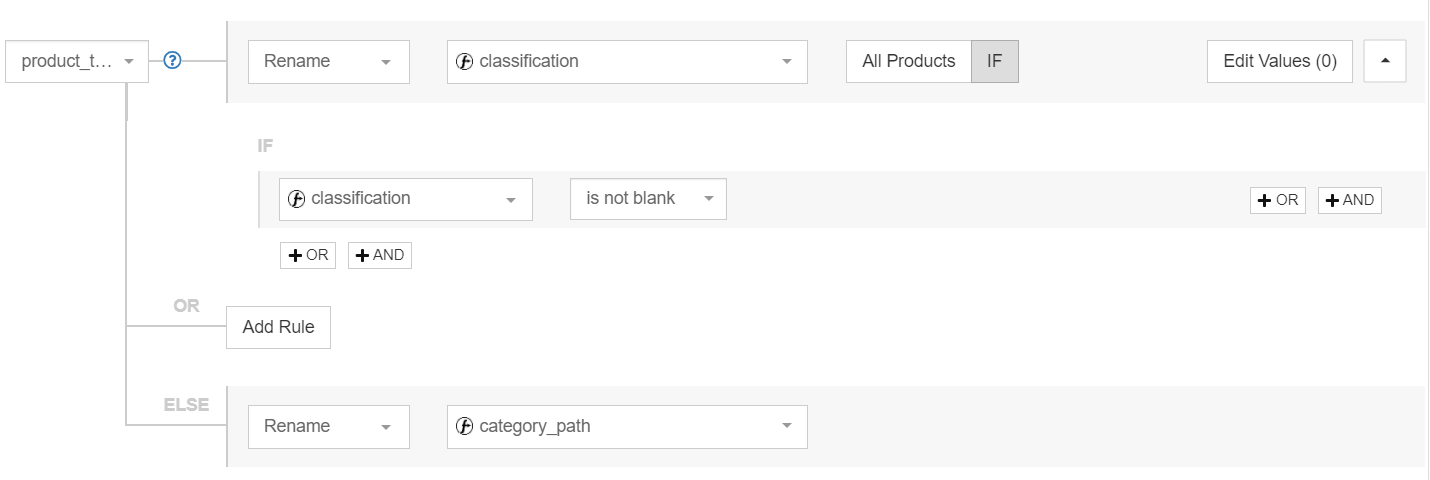
Category_path or classification → Product_type
This attribute is similar to Google_product_categories, but you can provide your own classification. It can also be used for creating product targets in your Google Ads account.
In your Magento store, you may have more than on category_path (for example: category_path1 or category_path3) so check what data each ones includes and choose the most accurate one.
The product_type attribute will be renamed from the Magento field category_path.
The category_name should just have one name like ‘Shoes’ and category_path should have a tree like ‘Apparel > Shoes’. It can look something like this:

Google's recommendation is to provide a product_type that includes multiple branches (like the category_path in the screenshot above) rather than one with just a single word description of the product like 'Shoes'.
Classification
Do you have 'classification' in your feed instead? You can use this to populate the field when it's available.
Magento product types
Be aware of getting Google’s attribute product_type mixed up with Magento’s product type categorization. It’s a common mistake, but they don’t mean the same thing.
When adding a new shop in Magento, you’ll see different product types that you can select. They consist of categories like Simple, Bundle, Virtual, etc. and they are specific to Magento. Read about them below.
Custom labels
Custom Labels on Google Shopping are basically offering you the opportunity to create groups of products based on conditions you are able to set yourself. You can create up to 5 custom label fields and define your own values for every custom label.
Adding these values for every individual product allows you to segment the biddings on your Product Listing Ads within your Shopping Campaigns.
Custom labels can be mapped from any Magento field. Common examples are:
- Gross Margin
- Season
- Best Sellers
- On sale, etc.
Tip: Check out this tactic of an interesting way of using custom labels in our Google Ads hacks article. It will show you how to segment your products for optimal bidding.
Parent _id → Item group ID
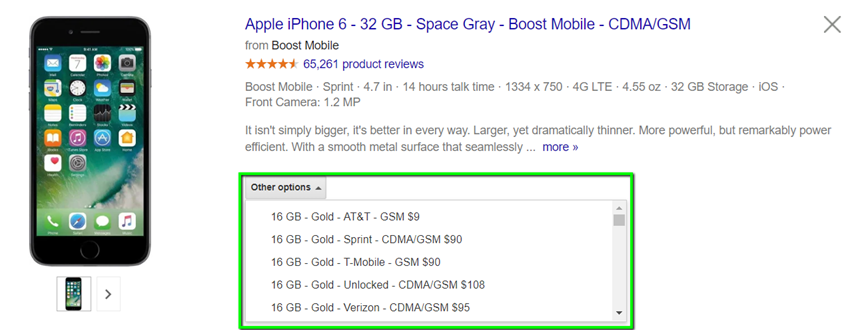
In Magento you create one configurable product that contains all attributes that the variant-products have in common: category, description, etc.
You use this as a template to create simple products, being variants of this configurable product, and you provide values for the attributes that differentiate them (color, price, size etc).
So if you sell an office chair that comes in green and blue, you really create 3 products: one configurable product and two simple products, being variants of this configurable product.
Google wants you to upload each variant as a separate product. If you have variants, you should keep two things in mind:
- Make sure that your simple products (variants) are downloaded by DataFeedWatch. We will automatically add all attributes from your configurable products.
- All variants of the same product must share the same item group id. The Item group id can be renamed from the Magento field – parent_id.
Magento product type
When you add a new shop, you will see 6 product types that you can select. These are specific to Magento and consist of the following categories:
Simple Products
This is the most popular product in Magento. It is a physical product with a SKU and no variations. For example, a cup, a table, a pencil. Simple product can be joined with a Grouped, Bundle or Configurable product types.
Bundle Products
A bundle of simple (or virtual) products. Magento Merchants can build their own product from the available portfolio. These products cannot be sold separately. For example, a bike where a customer chooses wheel size or damper type.
Every one of these items is a simple product, but can be sold as a bundle product.
Virtual Products
Non-physical product that cannot be touched, but can also be sold, like a warranty, a service, a reservation, insurance. Virtual products doesn’t let you select a shipping method and can be joined with Grouped and Bundle products.
Grouped Products
Enables a merchant to sell single products in groups or to group products by season or color. Price cannot be specified for grouped products, but a discount can be applied. For example, a mug is sold together with a plate.
Downloadable Products
Downloadable products are online software products, like an MP3 file, an eBook, a Magento extension, etc.. You cannot select a shipping method for downloadable products because there's nothing to ship.
Configurable Products
A configurable product is a simple product with a list of options. Each option is a single product with its own SKU, so it can be easily found in storage. For example, a jacket available in different colors or sizes or bike available in different frame sizes. Every variation can have its own cost.
Additional optimization
Our article wouldn't be complete without some additional areas you can optimize. Here's some more important areas to pay attention to.
Mobile compatibility
Mobile traffic is growing by the day and mobile purchases revenue is expected to be 43.4% of eCommerce revenue this year (2023) according to Insider Intelligence.
Google is constantly developing new features that target the mobile shoppers and in the light of these trends online merchants not only need to adapt the design of the web stores to mobile shopping, but they also need to improve the quality and tracking of the mobile ads.
One of the most important and powerful settings in Google Shopping Campaigns is adding the mobile_link attribute to the data feed. This will not only improve the mobile user experience but also offer additional reporting in the Merchant Center.

With a data feed management tool, it's easy as pie to set up the best data feed for Google Shopping directly from the Magento web store, because it saves a lot of time.
Product ratings
People love to buy products that have already been endorsed by other shoppers. If your customers love the products you sell and rave about them on your website or other sites, you should add these ratings to your product ads in Google Shopping.
Although not everyone will qualify for Google's Product Ratings program, as several conditions are required, the ones that do join have their products rated by customers with the five-stars rating system.
It's worth mentioning that one of the conditions to join the program is to have at least 50 reviews across all products and a minimum of 3 reviews per product in order for the review to show up in the product ad.
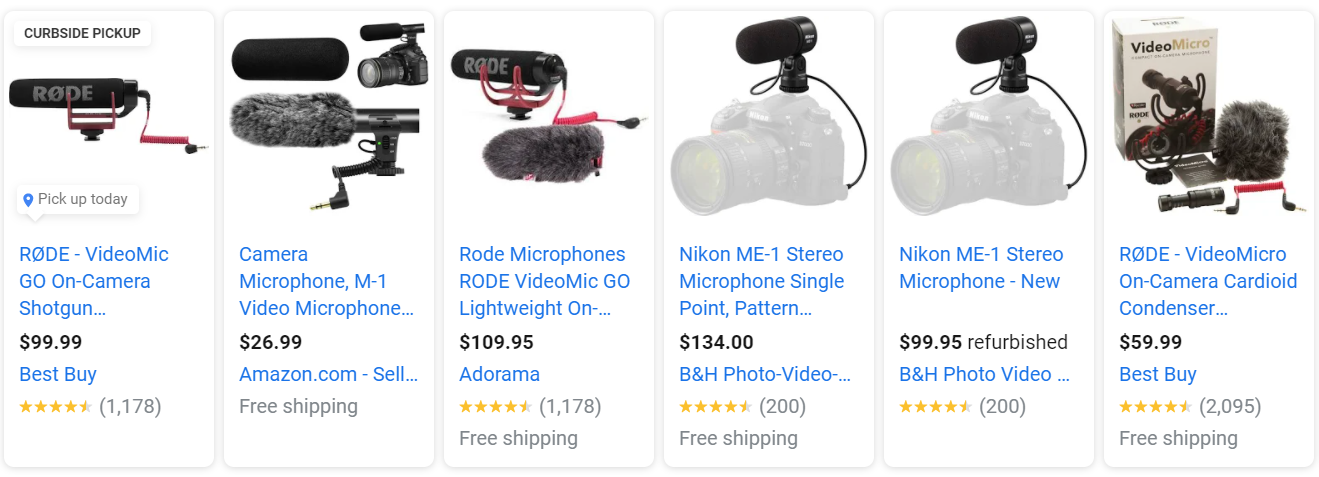
If you are serious about making the life of your customers easier and driving more traffic to the website you should start collecting the reviews as soon as possible. Feefo, ShopperApproved, Verified Reviews are some of the aggregators we recommend, but you can find Google's full list of approved third party product review aggregators here.
Conclusion
By using this guide, you’ll be able to properly match fields between Magento and Google Shopping. Once this is done, you’ve unlocked the next step of further optimizing your campaign.
It also gives you a head start against merchants who are building their data feed from scratch since you already started with all the data you need.
Taking advantage of a feed optimization solution like DataFeedWatch in this process will save you time, money and will also help you keep the process automated in the future.
